Showing posts with label Black. Show all posts

Monday, December 31, 2012

Happy 2013!!

Hey guys! Happy New Years eve! Only a few more hours here on the east coast until 2013! 2012 was filled with some not so great things, so we are hoping for more of a positive 2013 :)

Tonight's nails were quick and easy because I had no idea what to do lol. I started with a base of Manglaze Matte is Murder (2 coats) then did a glitter gradient of Manglaze Hot Mess on the tips, then using a small nail art brush added a "2013" to my ring finger with Hot Mess as well.

Then all done! I hope everyone has a fabulous night, please don't drink and drive, and be safe!


What do you guys think?

Until next time, and next year! Happy painting!
Pin It!

Saturday, December 29, 2012

New Years...Kind Of?

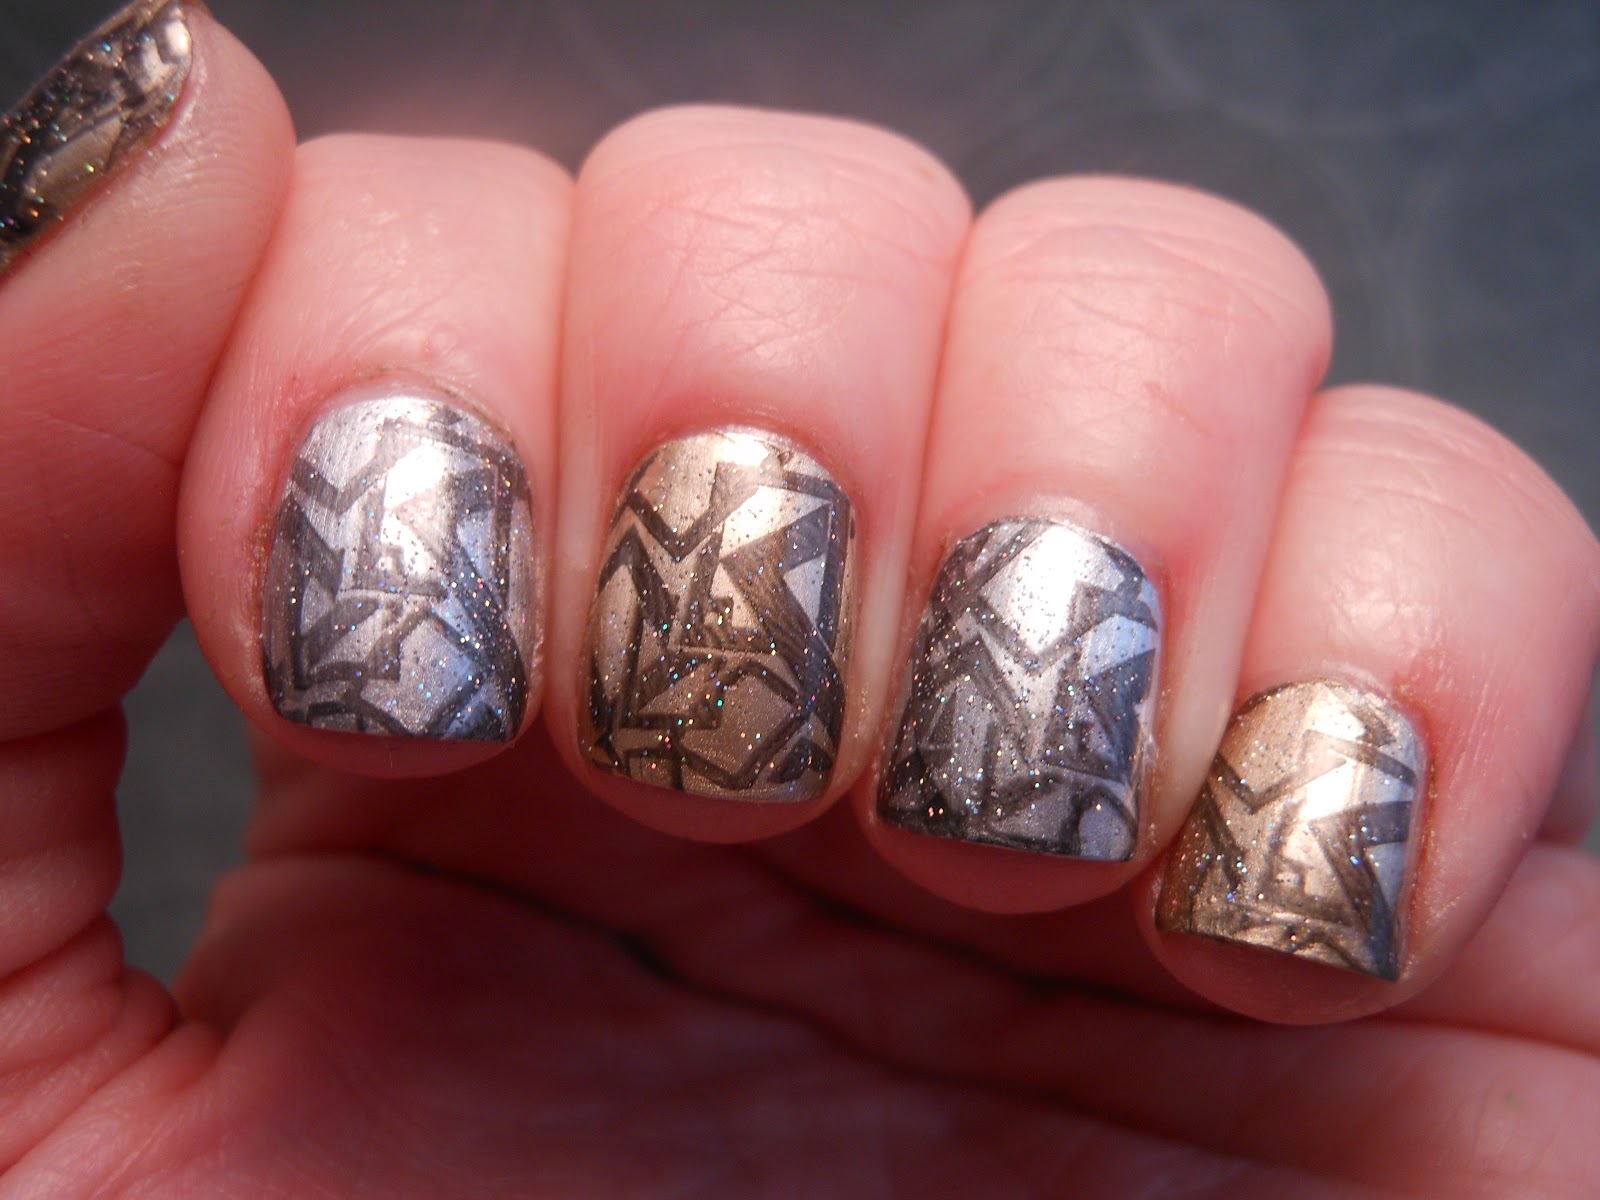
Hey guys! I hope everyone had a great Christmas! Here today with a sort of New Years themed mani, the colors are but the stamp...well you can decide!

My old man picked out a silver and gold metallic polishes and said do something with these lol....well my brain is fried so I kind of had no idea what to do!

I started with two coats of Essie As Good As Gold, and two coats of Pure Ice Silver Mercedes on alternating nails, I then used Sinful Colors Black on Black and Bundle Monster BM-320 for the stamp. I've loved this one since I first got them but this is my first time using it :) Once I was done I topped it all with China Glaze Fairy Dust.

Like I said New Years colors for sure, the print? Well who knows, but it's still fun!!


What do you guys think?

Until next time! Happy painting!
Pin It!

Wednesday, August 22, 2012

Back to School Post 1, Notebook Paper!

Hey guys! Here today with day one of my back to school posts, I have two more planned and may end up with more depending on my imagination heh ;) So why back to school you ask? Well today is the first day back at for fall semester at my school (California State University Fresno). I don't actually have classes today other than online, my classes start on campus tomorrow :)

I'm in my second semester of junior year, and I'm going to be in 5 classes this semester. So I'll try and keep up with my blog, but depending on how much work I have it may dwindle :( But I'll try my best!!

So today's post is notebook paper nails :) I started with two coats of Sinful Colors Snow Me White, then used the sky blue paint from my Migi Nail Art pens with a long thin nail art brush to draw the lines on the white, followed by OPI The Color Of Minnie for the red line, and the black dots as well as doodles are Sinful Colors Black on Black. I used a combo of the nail art brush and a small dotting tool for the doodles. They aren't perfect but I think it's adorable!!

One of my lilac plates does have a stamp on it that looks like notebook paper but it also has a "I heart you" on it which I didn't want on every single nail. But for those of you interested in that it's lilac's A01 plate, which is the same plate I used for my July 4th mani.


What do you guys think?

Until next time! Happy painting!


Pin It!

Saturday, August 18, 2012

Pinterest Inspiration Week, Day 4, Patchwork.

Hey guys! Here today with day 4 of Pinterest week :) Today's pin is here, with the original post here. This picture grabbed my attention because it reminded me of Sally from The Nightmare Before Christmas' dress! After reading the original post by the owner I realized that great minds think alike because she too thought that :)

For this design I was about as random as you can be! I just swiped on the different colored polishes where ever on my nails, then after the nail was filled I used a small nail art brush to make the "patch" lines :) My patch lines are a bit messy, which I didn't realize until I was done but it's because I need a new black, bad...it's almost gone and getting difficult to work with!

The colors I used for this are Essence Nail Art Twin Bonnie, Picture Polish Jade, Zoya Dannii, and Zoya Rory. I used two coats of each for their spots on my nails :)


What do you guys think?

Until next time! Happy painting!


Pin It!

Thursday, August 16, 2012

Pinterest Inspiration Week, Day 2, Lava Lamp.

Hey guys! It's day 2 of Pinterest inspiration week, and today's post once again came from one of Kayla's boards! This time it's her original art ;)

This is the picture from the pin, and this is her original post with the art. She called it neon drips, but I think it looks like a lava lamp!

I let the old man make the decision on the colors for this, and instead of a white background he thought it would look awesome with a black background. So I used two coats of Wet N Wild Ink Well as my base. He then decided pink and green for the lava, or drips would work.

For those that don't know I'm pink and he's green, it's just one of our things and I even have a pink and green star tattoo on my right wrist because of it ;)

Anyway back on track! Ha! The pink I used it Sinful Colors Folly and the green is Orly Fresh. This design is pretty simple and easy to do, just using a small nail art brush to make the outer lines of the lava itself, then I filled them in with the polish brush.

I think this is a super fun design, and it would be perfect for a 70s themed party!!


What do you guys think?

Until next time! Happy painting!

Pin It!

Wednesday, August 15, 2012

Pinterest Inspiration Week, Day 1, Love Letters.

Hey guys! Here today with the start of what will be a week of Pinterest inspired manis, sound familiar? Yep Kayla was doing it last week, and I'm borrowing the idea from her :)

Day 1 is love letter nails. I found the picture on Pinterest from one of Kayla's boards although it's not her art. The original post for this nail art design is here.

I started with two coat of China Glaze Hook And Line, which I'm in love with!! I didn't expect to like it as much as I do! Then using Bundle Monster Plates BM 303 and BM 311 with Wet N Wild Ink Well and Dr.'s Remedy Balance Brick for the stamping. The black didn't come out quite as dark as I would have liked, but I think it makes it look a bit like an old worn letter, and I think it's gorgeous and romantic looking!

SIDE NOTE if you, or someone you know has some awesome nail art boards please link them in a comment here for me :D


What do you guys think?

Until next time! Happy painting!

Pin It!

Monday, August 13, 2012

Fun With Striping Tape

Hey guys! Today I have something a little fun ;) I told you all in the last post that I wasn't done with what I called Rainbow Stained Glass Nails, I used some striping tape to create this look with inspiration to my childhood :)

Did any of you ever color paper with random colors, then color black over it so that you could scratch off the black and make designs? Well that's what I was going for with this look! I used one coat of Wet N Wild Ink Well over my already randomly colored nails and striping tape, pulled it all off and finished with a top coat.

It was pretty easy, since this was only my second time using striping tape I did have a bit of a problem with the tape itself, but other than that I was good to go! It's such a fun design that can be as random as you'd like it to be!

In the second there's a Crayola Color Wonder paper that my Monkey Butt (Brendan) colored on that has the same type of effect that the old school way of doing it does :D


What do you guys think?

Until next time! Happy painting!

Pin It!

Thursday, August 9, 2012

Pirate Treasure Map Tutorial

Hey guys! Here today with a new tutorial of my pirate treasure map nails. So many of you seemed to love them, so I figured I would show you how :)

I haven't figured out quite how to do a video tutorial yet so this one is just step by step pictures on how I achieved the look :)

First we have the materials I used to complete the entire look, Zoya Shay, Nubar Spark, Sinful Colors Mercury Rising, Wet N Wild Ink Well, OPI The Color Of Minnie, Migi Nail Art pen (the green side), nail art brush, nail dotting tool, makeup sponge and tweezers.


I started with two coats of Zoya Shay on all of my nails, or for this instance on 3 nails of a nail wheel. The easiest way I have found to do sponging is to use tweezers to hold a small piece of a makeup sponge that way I can get into smaller spaces without making a huge mess.


Using Nubar Spark I sponged around the outside of the nail, then repeated the process with Sinful Colors Mercury Rising. The first and second nail have just the Nubar, the third has both Nubar and Sinful Colors.


Using a nail art brush and Wet N Wild Ink Well draw an outline of a skull.


Using the nail dotting tool and the Wet N Wild Ink Well fill in the skull shape.


Once again using the nail art brush make an X under the skull, then using the nail dotting tool add two small dots at each end to make them look like bones.


Using the base color, and either the dotting tool or the nail art brush, add eyes, a nose and lines at the mouth. Then you're done with the skull and crossbones!


Using OPI The Color Of Minnie and the nail art brush, create random lines for the trail to the X that marks the spot.


Repeat the process on how ever many nails you want the trail to go over, then add a big X at the end. Using the nail art brush and Sinful Colors Mercury Rising draw a line for the tree bark, and with the Migi Nail Art pen green draw on a few branches for the palm tree. Using the dotting tool add a few little dots for coconuts on the tree.


And now you're done with the whole look! What will you find in your treasure chest??


What do you guys think?

Until next time! Happy painting!

Pin It!

Tuesday, July 24, 2012

Tutorial Tuesday!

Hey guys, sorry once again about my lack of posts. If you're on my blog's FB page you might have seen that I was sick. The old man and I had our 4 year anniversary on the 16th, so that weekend we were busy, then I got strep right after! Boo...so after I got a bit better we were busy finding our little man a preschool, phew!

But now things are starting to get a bit back to normal :) And today I have another group challenge with some other polish ladies/bloggers I'm friends with :)

Today is tutorial Tuesday, which isn't me giving a tutorial, but following one for today's mani :) There are SO many good videos, pictures etc all over the net (including a lot of the girls blogs that I follow!) but I happened to find a picture on Facebook on Tip Top Nails South Africa's page, they posted on my FB and asked that I check them out, so I did :)

So for this fun mani I used a base of Essence Nail Art Twin Romeo, then using the long skinny nail art brush I started with Wet N Wild Ink Well and did tiger type stripes over my nail leaving plenty of space between each one, I followed with OPI Lucerine-Tainly Look Marvelous, then Finger Paints Easel Come Easel Go, and ended using Catrice Birds Flying High (which I just got in a surprise swap from Denmark, yay!).

I did use way different colors than the tutorial, and for my blue I did switch it a little bit from the tutorial as well. But I am in love with the end result. I think these colors are fabulous together, and it for me brings it all together in a sophisticated color scheme that's sexy! BUT let's see what you guys think! :)


For those of you that didn't click on the link, this is the original picture below :)


What do you guys think?

Until next time! Happy painting!


Pin It!

Tuesday, July 10, 2012

Summer Fun Challenge, Summer Stylin!

Hey guys! Guess what? It's day 7 (or post 7) of the Neverland Nail Blog's summer fun nail art challenge! Today is all about summer style, something inspired by some sort or fashion you have seen somewhere.

Because I'm not huge on keeping up with fashion trends (let's face it, the 80s styles shouldn't have been around the first time) or what's on the runway, which recently seems to be old lady prints. I just kind of did my own thing! I have however seen quite a few different home decorative items that look similar to what I did.

So quick run down, I got my nails filled and cut down yesterday (yay!!) and me being a bit of a control freak from time to time, I took my own polish! I took with me Hits Atena, and she is currently on my toes as well as my fingers! She is too beautiful to part with so fast, so I just decided to stamp over her, since I got my set of the new Bundle Monster plates yesterday!!

I have tired to freehand a design similar to this before without much luck, so I was super excited to see this image on BM plate 314! Now be polite! This is only my 3rd or 4th time doing a full nail stamp, so I'm no expert (yet) but I think I did a pretty good job. Sorry about the not so great pics, The bottom one was with no flash and a bulb that should work as daylight, uh not so much, tips or advice there would be great!

Oh and this is two coats of Atena btw, and I used Sinful Colors black on black to stamp with :)


What do you guys think?

Until next time! Happy painting!


Pin It!

Monday, July 2, 2012

Monochrome Monday! Mooooo!!

Hey guys! Here today with another group challenge brought to you by the PLOP ladies! This week was all about monochrome, in other words, black and white! A few of the ladies used gray too :) Now at first it sounds a bit boring right? Far from it!!! Once I saw what the others had done I was a bit intimidated and didn't know what to do until last minute.

Being as how I live in California's central valley, there are tons of dairies around here, so why not do cows?! Instead of just going the cow print route I went in a old school milk carton kind of way, complete with a (smeared) barcode!! All I used for this was Sinful Colors Snow me White, and Wet N Wild Ink Well, a dotting tool, long skinny nail art brush and Lilac's A01 plate.


What do you guys think? Does it moove you? ;)

Until next time! Happy painting!


Pin It!

Thursday, June 28, 2012

Summer Fun Challenge, Hot Hot Hot!!!

Hey guys! Today I have post 4 of the Summer Fun nail art Challenge from Lindsey over at Neverland Nail Blog. I just like last time had an idea that I ended up changing because well, it would have been pretty much impossible since I don't have a mirror polish lol

So for today's challenge I did started with a base coat of white, and did a gradient from yellow to red, the red turned out more pink because of the white base, but I'm okay with that! Yellow I used Zoya Pippa, Orange I used Essie Orange It's Obvious, and the Red is OPI The Color of Minnie. I then used one coat of OPI DS Shimmer (my pointer ended up with a thicker coat) to make my hot gradient sparkle!

I then used ManGlaze Matte is Murder with a nail art brush to draw on the flames, and filled it in with a dotting tool, hence why it's kind of lumpy. I wanted this contrast because I thought it would be awesome! Holo flames and matte black mmmm.


What do you guys think?

Until next time! Happy painting!


Pin It!